hull

Porcelain Tiled Utility Floor Before After Cleaning and Grout Sealing in Hull

Dirty Porcelain Tiled Utility Room Cleaned and Sealed in Hull

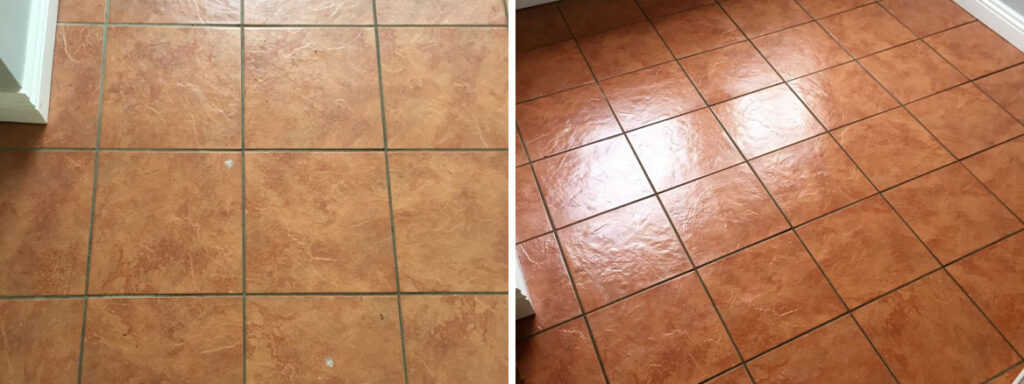
This Porcelain tiled utility room at a property in Hull had been primarily used as an area for the household dogs, and so had suffered over the years from plenty of wear and tear.

Originating in China, Porcelain is a type of ceramic that is known to be quite hard-wearing and durable, however, dogs are known to bring all manner of muck into the house from outside, and it was certainly beginning to show here. The property owner was keen to have the tiles professionally cleaned and sealed, with the grout lines being in a particularly dire state.

Porcelain Tiled Utility Floor Before Cleaning in Hull

Cleaning a Dirty Porcelain Tiled Utility Room

To begin the cleaning process I firstly mixed a 60-40 mix of Tile Doctor Pro Clean and water. Pro Clean is our go-to cleaner for natural stone tiles due to its consistency and versatility. I applied it to the tiles and grout lines and left it to dwell for a short while, allowing it time to loosen the layers of muck and also break down any old sealer remaining on the floor.

Next, I scrubbed the solution into the floor with a 17″ rotary machine, and paid special attention to cleaning the grout lines with a wire brush, bringing them back to their original colour. Any resulting cleaning residue was removed with a wet vacuum and any chemicals remaining on the floor were washed away using a thorough rinse with water.

Sealing a Porcelain Tiled Utility Room

Before the floor could be sealed, it needed to be left to dry overnight. It is always recommended to leave freshly cleaned floors to dry for at least 24 hours before sealing, since even the slightest amount of moisture can cloud the sealer and damage its performance. Running damp tests is a good idea to make certain that the floor is completely dry.

Porcelain Tiled Utility Floor During Grout Sealing in Hull
Once satisfied that the tiles and grout lines had been fully dried out, I proceeded to seal the floor with Tile Doctor Ultra Seal. Ultra Seal is an robust impregnating sealer that prevents dirt from becoming ingrained in the grout and the stone itself, thus making the floor much easier to keep clean in the future.

The sealer also gave the floor with a bright, natural look finish, leaving it worlds apart from the condition it was in just a day previously. Needless to say the customer was very happy and impressed with the results achieved in a short space of time.

Porcelain Tiled Utility Floor After Cleaning and Grout Sealing in Hull
 

Professional Tile and Grout Cleaning and Sealing for a Dirty Porcelain Tiled Utility Room in Hull

Dirty Porcelain Tiled Utility Room Cleaned and Sealed in Hull Read More »

Oyster Slate Fireplace Before After Sealing Hull

Oyster Slate Tiled Fireplace Installed, Cleaned, and Sealed in Hull

While at Tile Doctor we are more often than not asked to carry out professional maintenance for existing tiling installation we have also been known to do the installation as well. This was the case with this customer, living at a property in Hull, who contacted me about a full tile installation on their fireplace, situated in a living room which itself was undergoing some redecoration. I recommended an Oyster Slate tile, a natural stone which contains a nice range of black, brown and white shades to give walled areas a really distinct look.

Oyster Slate Fireplace Before Installation Hull
I explained to my customer – who was very happy with the choice of tile – that the fireplace would have be cleaned and sealed once the Slate tiles had been installed. This customer planned on having a coal fire installed following the tiling, but without a robust seal the Slate would be blackened by the coal and become difficult to clean.

Oyster Slate Fireplace After Installation Right Hull

Cleaning and Sealing an Oyster Slate Tiled Fireplace

Once I had successfully tiled the fireplace with the new Oyster Slate, I set about cleaning the area with an application of Tile Doctor’s versatile alkaline-based cleaner, Pro Clean. The tiles were caked with debris and dust from the tile installation, but Pro Clean – which is suitable for use on most types of natural stone tile – quickly cut through the layers of dirt and left the area looking perfectly clean and ready to be sealed.

My choice of sealer was Tile Doctor Ultra Seal, an impregnating sealer which soaks into and fills the pores of the Slate, thus preventing dirt – such as debris from a coal fire – from becoming ingrained in the stone. Ingrained dirt can make tiles notoriously difficult to clean, so it’s always recommended that you have use a suitable sealer – and keep it topped up – to make your life easier when maintaining the appearance of your tiles in future.

Oyster Slate Fireplace After Sealing Hull
The sealer also enhanced the natural colours in the slate enhancing the look of the fireplace and the customer was very pleased with her new tiled fireplace with a robust seal in place she will not have to worry about its appearance becoming spoiled any time soon.

Fireplace Tiled with Oyster Slate, Cleaned and then Sealed in Yorkshire

Oyster Slate Tiled Fireplace Installed, Cleaned, and Sealed in Hull Read More »

Travertine Wall Tiles Cleaned Polished and Sealed Hull

Travertine Bathroom Wall Tiles Refinished Following Installation

For this job, I was asked to work on my client’s newly installed bathroom in their house in Hull, the largest city in East Yorkshire. The new bathroom consisted of natural Travertine stone, and my task was to give the tiles a thorough clean, polish and seal. Travertine is a form of limestone with a distinct appearance consisting mainly of tan, white and cream-coloured shades. It’s commonly used for both residential and commercial use; although recently installed the tiles were dull and lifeless and not looking anywhere near their best.

Travertine Wall tiles Before Cleaning Polishing and sealing Hull Travertine Wall tiles Before Cleaning Polishing and sealing Hull

Polishing and cleaning Travertine bathroom tiles

My first task was to polish the wall tiles using the Tile Doctor burnishing system, this consists of four six-inch buffing pads with different grits. Starting with a coarse pad you grind off any dirt off the tile before moving onto the medium, fine and very fine pads which build up the polish. The result was a superior polished finish, as you can see from the below photo

Travertine Wall tiles Before Cleaning and Polishing Hull Travertine Wall tiles After Cleaning and Polishing Hull

After achieving the desired polished finish, I set about cleaning the tiles using a solution of Tile Doctor Pro-Clean, a high alkaline cleaner safe to use on stone and grout, diluted with water. Once mixed, the solution was applied using spray bottles as the air makes the solution lighter and enables it to stick to the vertical surface. The solution was then scrubbed into the tile and grout to lift out any ingrained dirt and muck left over from the initial installation of the bathroom.

Following the clean I gave the bathroom tiles a good rinse with water to remove any trace of product; I used a wet-vacuum machine to remove any excess residue and left the tiles to dry.

Sealing Travertine bathroom tiles

The last step was to seal the bathroom Travertine tiles. After checking to make sure the whole area was completely dry, I applied five coats of Tile Doctor Colour Grow. Colour Grow is a colour intensifying, impregnating sealer which accentuated the natural shades in the Travertine, while at the same time providing a durable surface seal. The product is suitable for use on both internal and external Travertine tiled floors and walls, along with a range of other natural stone surfaces.

The sealer was applied using cloths, and the Tile Doctor three cloth system. The surface was also buffed after the application of each coat of sealer.

Travertine Wall tiles Cleaned Polished and sealed Hull Travertine Wall tiles Cleaned Polished and sealed Hull

My client was very pleased with the end results; the Travertine surface finish is now looks exactly the way she had expected it to look.

Clean, polish and seal for Travertine bathroom wall tiles in Hull

Travertine Bathroom Wall Tiles Refinished Following Installation Read More »

Changing Grout Colour on Wood Effect Tiles in Hull Step

Changing the Colour of Grout on a Wood Effect Floor in Victoria Dock

I recently went down to the city of Hull, the biggest in East Yorkshire, for this job after I was contacted by a client living in the Victoria Dock area. My client had a very nice wood effect Porcelain floor, but she was not happy with current colour of the grout, which was a light grey, and wanted it changed to a dark grey instead. The floor was very well maintained – with Porcelain being a highly resistant material – and so it did not require a deep clean itself. On this particular occasion, my main focus was on the grout.

Changing Grout Colour on Wood Effect Tiles in Hull Step 2

Applying the pre-treatment cleaner

The Tile Doctor Grout Colourant kit consists of a pre-treatment cleaner and the colour seal, along with a grout brush and scrub pad to apply the products. My first task was to apply the pre-treatment cleaner to the grout. This prepares the grout joints for a superior grout colourant bond.

Changing Grout Colour on Wood Effect Tiles in Hull Step 1
Once sprayed on to grout, the pre-treatment cleaner was left to sit for 1-2 minutes before being worked in with the nylon grout brush. Any excess cleaner and dirt was then rinsed off with clean water to prepare the grout for re-colouring.

Changing the grout colour

The next stage of the re-colouring was to apply the grout colourant itself. I applied the dark grey colourant very carefully using an applicator brush, ensuring that it was distributed as evenly as possible along the grout lines.

Changing Grout Colour on Wood Effect Tiles in Hull Step 3 Changing Grout Colour on Wood Effect Tiles in Hull Step 4

I then left the grout to dry for a couple of hours, before using clean water in combination with a scrub pad to remove the excess. As you can see from the photographs, the overall result was a whole new look for the floor, with the dark grey colour accentuating the fantastic wood effect Porcelain, more so than the light grey had done previously.

Changing Grout Colour on Wood Effect Tiles in Hull Step 5
Both myself and my client were very pleased with a job well done.

Changing Grout Colour on Wood Effect Tiles in Hull Step 6
 

Re-colouring the grout on wood effect floor in Victoria Dock

Changing the Colour of Grout on a Wood Effect Floor in Victoria Dock Read More »

Scroll to Top